警报组件有助于显示一个对话框,即向用户弹出一个带有标题、消息、按钮的弹出窗口,以便根据显示的消息了解用户的确认。
基本组件警报如下 -
Alert.alert('yourtile', 'yourmessage', [yourbuttons], ‘options’)要使用警报组件,您需要按如下方式导入它 -
import { Alert } from 'react-native';要获取弹出窗口,您只需调用 Alert.alert() 函数。 Alert() 有四个参数,分别是标题、消息、按钮和选项。标题是强制参数,其余参数是可选的。
这是一个关于如何使用 Alert.alert() 的简单示例 -
Alert.alert(
   "Hi",
   "Do you want to continue?",
   [
      {
         text: "Later",
         onPress: () => console.log("User pressed Later")
      },
      {
         text: "Cancel",
         onPress: () => console.log("Cancel Pressed"),
         style: "cancel"
      },
      { text: "OK",
         onPress: () => console.log("OK Pressed")
      }
   ],
   { cancelable: false }
);这里的标题是“嗨”,消息是“你想继续吗”,我想在对话框中显示的按钮是“稍后”、“取消”和“确定”。对于添加的每个按钮 onPress 事件,该事件显示一条控制台消息。最后是选项参数,它可以用来控制弹出窗口的行为。在 Android 上,默认情况下,如果在弹出窗口边界外单击,弹出窗口将关闭。要禁用它,您可以使用 { cancelable: false } 作为选项参数。当您点击弹出区域之外时,由于可取消设置为 false,它不会关闭。
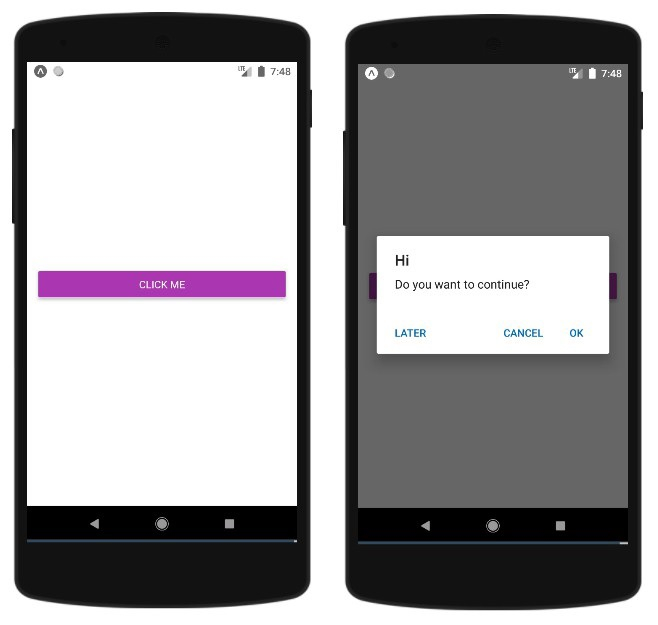
在 iOS 中,您可以指定任意数量的按钮,但在 Android 中,您可以使用三个按钮。 Android 中的三个按钮具有中性、消极和积极按钮的概念 -
如果指定一个按钮,它将类似于“积极” ' 例如“确定”。
如果有两个按钮,第一个为“负”,第二个为“正”。例如“取消”和“确定”。

Android文档-开发者指南-第一部分:入门-中英文对照版 Android提供了丰富的应用程序框架,它允许您在Java语言环境中构建移动设备的创新应用程序和游戏。在左侧导航中列出的文档提供了有关如何使用Android的各种API来构建应用程序的详细信息。第一部分:Introduction(入门) 0、Introduction to Android(引进到Android) 1、Application Fundamentals(应用程序基础) 2、Device Compatibility(设备兼容性) 3、
 11
11

如果是三个按钮,则为“中性”、“消极”、“积极”。例如“稍后”、“取消”和“确定”
这是一个显示警报组件工作原理的工作示例 -
import React from 'react';
import { Button, View, Alert } from 'react-native';
const App = () => {
   const testAlert = () =>
   Alert.alert(
      "Hi",
      "Do you want to continue?",
      [
         {
            text: "Later",
            onPress: () => console.log("User pressed Later")
         },
         {
            text: "Cancel",
            onPress: () => console.log("Cancel Pressed"),
            style: "cancel"
         },
         { text: "OK",
            onPress: () => console.log("OK Pressed")
         }
      ],
      { cancelable: false }
   );
   return (
      <View style={{flex :1, justifyContent: 'center', margin: 15 }}>
         <Button
            title="Click Me"
            color="#9C27B0"
            onPress={testAlert}
         />
      </View>
   );
}
export default App;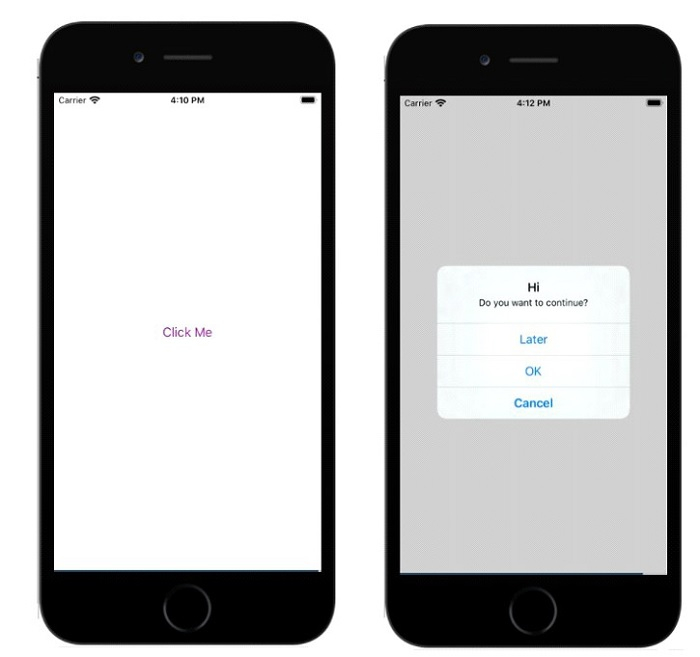
在下面的示例中,{cancelable: true } 与标题、消息和按钮一起使用。所以警报框将如下所示 -
Alert.alert(
   "Hi",
   "Do you want to continue?",
   [
      {
         text: "Later",
         onPress: () => console.log("User pressed Later")
      },
      {
         text: "Cancel",
         onPress: () => console.log("Cancel Pressed"),
         style: "cancel"
      },
      { text: "OK",
         onPress: () => console.log("OK Pressed")
      }
   ],
   { cancelable: true }
);完整的工作示例如下 -
import React from 'react';
import { Button, View, Alert } from 'react-native';
const App = () => {
   const testAlert = () =>
   Alert.alert(
      "Hi",
      "Do you want to continue?",
      [
         {
            text: "Later",
            onPress: () => console.log("User pressed Later")
         },
         {
            text: "Cancel",
            onPress: () => console.log("Cancel Pressed"),
            style: "cancel"
         },
         { text: "OK",
            onPress: () => console.log("OK Pressed")
         }
      ],
      { cancelable: true }
   );
   return (
      <View style={{flex :1, justifyContent: 'center', margin: 15 }}>
         <Button
            title="Click Me"
            color="#9C27B0"
            onPress={testAlert}
         />
      </View>
   );
}
export default App;当您点击弹出区域之外时,它将关闭。
以上就是如何在 ReactNative 中使用警报对话框?的详细内容,更多请关注php中文网其它相关文章!

每个人都需要一台速度更快、更稳定的 PC。随着时间的推移,垃圾文件、旧注册表数据和不必要的后台进程会占用资源并降低性能。幸运的是,许多工具可以让 Windows 保持平稳运行。

Copyright 2014-2025 https://www.php.cn/ All Rights Reserved | php.cn | 湘ICP备2023035733号


 538
538