侯赛因·阿里夫撰写✏️
想象一下这样的情况:一群建筑师想要设计一座摩天大楼。在设计阶段,他们必须考虑很多因素,例如:
需要考虑的因素有很多,但有一点是可以确定的:很可能已经有一份蓝图可以帮助建造这座摩天大楼。如果没有通用的设计或计划,这些架构师将不得不重新发明轮子,这可能会导致混乱和多重低效率。
类似地,在编程世界中,开发人员经常参考一组设计模式来帮助他们构建软件,同时遵循干净的代码原则。此外,这些模式无处不在,从而让程序员专注于交付新功能,而不是每次都重新发明轮子。
在本文中,您将了解一些常用的 javascript 设计模式,并且我们将一起构建小型 node.js 项目来说明每种设计模式的用法。
立即学习“Java免费学习笔记(深入)”;
设计模式是预先制作的蓝图,开发人员可以对其进行定制以解决编码期间的重复设计问题。要记住的一件重要的事情是,这些蓝图不是代码片段,而是应对即将到来的挑战的一般概念。
设计模式有很多好处:
在本文中,我们将介绍三类设计模式:
让我们看看这些设计模式的实际应用!
顾名思义,创建模式包含各种帮助开发人员创建对象的方法。
工厂方法是一种创建对象的模式,可以更好地控制对象的创建。这种方法适用于我们希望将对象创建逻辑集中在一处的情况。
以下是一些示例代码,展示了此模式的实际效果:
//file name: factory-pattern.js
//use the factory javascript design pattern:
//step 1: create an interface for our object. in this case, we want to create a car
const createcar = ({ company, model, size }) => ({
//the properties of the car:
  company,
  model,
  size,
  //a function that prints out the car's properties:
  showdescription() {
    console.log(
      "the all new ",
      model,
      " is built by ",
      company,
      " and has an engine capacity of ",
      size,
      " cc "
    );
  },
});
//use the 'createcar' interface to create a car
const challenger = createcar({
  company: "dodge",
  model: "challenger",
  size: 6162,
});
//print out this object's traits:
challenger.showdescription();
让我们逐段分解这段代码:createcarcar
我们来测试一下吧!我们应该期望程序注销我们新创建的 car 实例的详细信息:
builder 方法让我们可以使用逐步的对象构造来构建对象。因此,这种设计模式非常适合我们想要创建对象并仅应用必要功能的情况。因此,这提供了更大的灵活性。
这是使用构建器模式创建 car 对象的代码块:
//builder-pattern.js
//step 1: create a class reperesentation for our toy car:
class car {
  constructor({ model, company, size }) {
    this.model = model;
    this.company = company;
    this.size = size;
  }
}
//use the 'builder' pattern to extend this class and add functions
//note that we have seperated these functions in their entities.
//this means that we have not defined these functions in the 'car' definition.
car.prototype.showdescription = function () {
  console.log(
    this.model +
      " is made by " +
      this.company +
      " and has an engine capacity of " +
      this.size +
      " cc "
  );
};
car.prototype.reducesize = function () {
  const size = this.size - 2; //function to reduce the engine size of the car.
  this.size = size;
};
const challenger = new car({
  company: "dodge",
  model: "challenger",
  size: 6162,
});
//finally, print out the properties of the car before and after reducing the size:
challenger.showdescription();
console.log('reducing size...');
//reduce size of car twice:
challenger.reducesize();
challenger.reducesize();
challenger.showdescription();
这是我们在上面的代码块中所做的事情:
预期输出应该是挑战者对象在我们将其大小减少四个单位之前和之后的属性:  这证实了我们在 javascript 中的构建器模式实现是成功的!
结构设计模式专注于我们程序的不同组件如何协同工作。
适配器方法允许接口冲突的对象一起工作。这种模式的一个很好的用例是当我们想要在不引入重大更改的情况下使旧代码适应新代码库时:
//adapter-pattern.js
//create an array with two fields:
//'name' of a band and the number of 'sold' albums
const groupswithsoldalbums = [
  {
    name: "twice",
    sold: 23,
  },
  { name: "blackpink", sold: 23 },
  { name: "aespa", sold: 40 },
  { name: "newjeans", sold: 45 },
];
console.log("before:");
console.log(groupswithsoldalbums);
//now we want to add this object to the 'groupswithsoldalbums'
//problem: our array can't accept the 'revenue' field
// we want to change this field to 'sold'
var illit = { name: "illit", revenue: 300 };
//solution: create an 'adapter' to make both of these interfaces..
//..work with each other
const cost_per_album = 30;
const converttoalbumssold = (group) => {
  //make a copy of the object and change its properties
  const tempgroup = { name: group.name, sold: 0 };
  tempgroup.sold = parseint(group.revenue / cost_per_album);
  //return this copy:
  return tempgroup;
};
//use our adapter to make a compatible copy of the 'illit' object:
illit = converttoalbumssold(illit);
//now that our interfaces are compatible, we can add this object to the array
groupswithsoldalbums.push(illit);
console.log("after:");
console.log(groupswithsoldalbums);
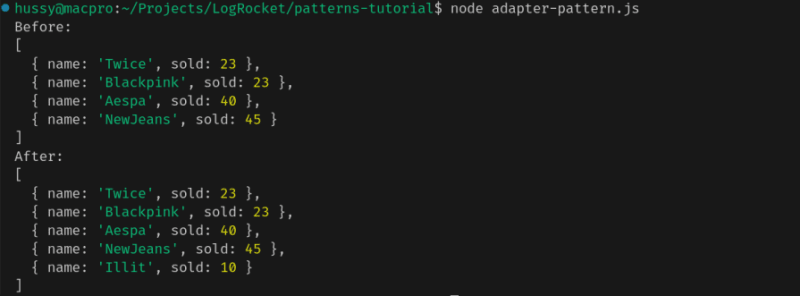
这是此片段中发生的事情:
运行此代码时,我们希望我们的 illit 对象成为 groupswithsoldalbums 列表的一部分:
此设计模式允许您在创建后向对象添加新方法和属性。当我们想要在运行时扩展组件的功能时,这非常有用。

电子手机配件网站源码是一个响应式的织梦网站模板,软件兼容主流浏览器,且可以在PC端和手机端中进行浏览。模板包含安装说明,并包含测试数据。本模板基于DEDECms 5.7 UTF-8设计,需要GBK版本的请自己转换。模板安装方法:1、下载最新的织梦dedecms5.7 UTF-8版本。2、解压下载的织梦安装包,得到docs和uploads两个文件夹,请将uploads里面的所有文件和文件夹上传到你的
 0
0

如果您有 react 背景,这与使用高阶组件类似。下面是一段代码,演示了 javascript 装饰器设计模式的使用:
//file name: decorator-pattern.js
//step 1: create an interface
class musicartist {
  constructor({ name, members }) {
    this.name = name;
    this.members = members;
  }
  displaymembers() {
    console.log(
      "group name",
      this.name,
      " has",
      this.members.length,
      " members:"
    );
    this.members.map((item) => console.log(item));
  }
}
//step 2: create another interface that extends the functionality of musicartist
class performingartist extends musicartist {
  constructor({ name, members, eventname, songname }) {
    super({ name, members });
    this.eventname = eventname;
    this.songname = songname;
  }
  perform() {
    console.log(
      this.name +
        " is now performing at " +
        this.eventname +
        " they will play their hit song " +
        this.songname
    );
  }
}
//create an instance of performingartist and print out its properties:
const akmu = new performingartist({
  name: "akmu",
  members: ["suhyun", "chanhyuk"],
  eventname: "mnet",
  songname: "hero",
});
akmu.displaymembers();
akmu.perform();
让我们解释一下这里发生了什么:
代码的输出应该确认我们通过 performingartist 类成功为乐队添加了新功能:
此类别重点关注程序中的不同组件如何相互通信。
责任链设计模式允许通过组件链传递请求。当程序收到请求时,链中的组件要么处理它,要么将其传递,直到程序找到合适的处理程序。
这是解释此设计模式的插图:  存储桶或请求沿着组件链向下传递,直到找到有能力的组件。当找到合适的组件时,它将处理该请求。来源:refactoring guru。[/caption] 此模式的最佳用途是 express 中间件函数链,其中函数可以处理传入请求或通过 next() 方法将其传递给下一个函数:
//real-world situation: event management of a concert
//implement cor javascript design pattern:
//step 1: create a class that will process a request
class leader {
  constructor(responsibility, name) {
    this.responsibility = responsibility;
    this.name = name;
  }
  //the 'setnext' function will pass the request to the next component in the chain.
  setnext(handler) {
    this.nexthandler = handler;
    return handler;
  }
  handle(responsibility) {
  //switch to the next handler and throw an error message:
    if (this.nexthandler) {
      console.log(this.name + " cannot handle operation: " + responsibility);
      return this.nexthandler.handle(responsibility);
    }
    return false;
  }
}
//create two components to handle certain requests of a concert
//first component: handle the lighting of the concert:
class lightsengineerlead extends leader {
  constructor(name) {
    super("light management", name);
  }
  handle(responsibility) {
  //if 'lightsengineerlead' gets the responsibility(request) to handle lights,
  //then they will handle it
    if (responsibility == "lights") {
      console.log("the lights are now being handled by ", this.name);
      return;
    }
    //otherwise, pass it to the next component.
    return super.handle(responsibility);
  }
}

//second component: handle the sound management of the event:
class soundengineerlead extends leader {
  constructor(name) {
    super("sound management", name);
  }
  handle(responsibility) {
  //if 'soundengineerlead' gets the responsibility to handle sounds,
  // they will handle it
    if (responsibility == "sound") {
      console.log("the sound stage is now being handled by ", this.name);
      return;
    }
    //otherwise, forward this request down the chain:
    return super.handle(responsibility);
  }
}
//create two instances to handle the lighting and sounds of an event:
const minji = new lightsengineerlead("minji");
const danielle = new soundengineerlead("danielle");
//set 'danielle' to be the next handler component in the chain.
minji.setnext(danielle);
//ask minji to handle the sound and lights:
//since minji can't handle sound management,
// we expect this request to be forwarded
minji.handle("sound");
//minji can handle lights, so we expect it to be processed
minji.handle("lights");
在上面的代码中,我们模拟了音乐会上的情况。在这里,我们希望不同的人承担不同的责任。如果一个人无法处理某项任务,则会将其委托给列表中的下一个人。
最初,我们声明了一个具有两个属性的 leader 基类:
此外,每个leader都会有两个功能:
接下来,我们创建了两个子类,分别称为 lightsengineerlead(负责照明)和 soundengineerlead(处理音频)。后来,我们初始化了两个对象——minji和danielle。我们使用 setnext 函数将 danielle 设置为责任链中的下一个处理程序。
最后,我们请minji处理声音和灯光。
当代码运行时,我们期望 minji 尝试处理我们的声音和灯光职责。由于minji不是音频工程师,因此应该将sound交给有能力的处理人员。在本例中,是丹尼尔:
策略方法允许您定义算法集合并在运行时在它们之间进行交换。此模式对于导航应用程序很有用。这些应用程序可以利用此模式在不同用户类型(骑行、驾驶或跑步)之间切换路线:
此代码块演示了 javascript 代码中的策略设计模式:
//situation: Build a calculator app that executes an operation between 2 numbers.
//depending on the user input, change between division and modulus operations

class CalculationStrategy {
  performExecution(a, b) {}
}
//create an algorithm for division
class DivisionStrategy extends CalculationStrategy {
  performExecution(a, b) {
    return a / b;
  }
}
//create another algorithm for performing modulus
class ModuloStrategy extends CalculationStrategy {
  performExecution(a, b) {
    return a % b;
  }
}
//this class will help the program switch between our algorithms:
class StrategyManager {
  setStrategy(strategy) {
    this.strategy = strategy;
  }
  executeStrategy(a, b) {
    return this.strategy.performExecution(a, b);
  }
}

const moduloOperation = new ModuloStrategy();
const divisionOp = new DivisionStrategy();
const strategyManager = new StrategyManager();
//use the division algorithm to divide two numbers:
strategyManager.setStrategy(divisionOp);
var result = strategyManager.executeStrategy(20, 4);
console.log("Result is: ", result);
//switch to the modulus strategy to perform modulus:
strategyManager.setStrategy(moduloOperation);
result = strategyManager.executeStrategy(20, 4);
console.log("Result of modulo is ", result);
这是我们在上面的块中所做的:
当我们执行这个程序时,预期的输出是strategymanager首先使用divisionstrategy来除两个数字,然后切换到modulostrategy以返回这些输入的模数:
在本文中,我们了解了设计模式是什么,以及它们为什么在软件开发行业中有用。此外,我们还了解了不同类别的 javascript 设计模式并在代码中实现了它们。
调试代码始终是一项繁琐的任务。但你越了解自己的错误,就越容易纠正它们。
logrocket 允许您以新的、独特的方式理解这些错误。我们的前端监控解决方案跟踪用户与 javascript 前端的互动,使您能够准确查看用户的操作导致了错误。

logrocket 记录控制台日志、页面加载时间、堆栈跟踪、带有标头 + 正文的慢速网络请求/响应、浏览器元数据和自定义日志。了解 javascript 代码的影响从未如此简单!
免费试用。
以上就是JavaScript 设计模式指南的详细内容,更多请关注php中文网其它相关文章!

每个人都需要一台速度更快、更稳定的 PC。随着时间的推移,垃圾文件、旧注册表数据和不必要的后台进程会占用资源并降低性能。幸运的是,许多工具可以让 Windows 保持平稳运行。

Copyright 2014-2025 https://www.php.cn/ All Rights Reserved | php.cn | 湘ICP备2023035733号