如何实现粒子动画效果?1.使用javascript操作canvas,初始化canvas元素并获取上下文;2.定义particle类,包含位置、速度、大小、颜色等属性,并实现draw()和update()方法;3.创建粒子数组,随机生成多个粒子实例;4.使用requestanimationframe创建动画循环,不断更新和绘制粒子;5.可添加交互效果,如鼠标移动影响粒子运动。优化性能的方法包括减少粒子数量、使用离屏canvas、优化更新逻辑、减少状态切换、使用web workers、合理使用透明度、避免shadowblur。实现复杂运动包括吸引力、排斥力、跟随效果,通过修改update()方法引入力学模型。交互性可通过键盘、触摸、音频输入、重力感应等方式实现。
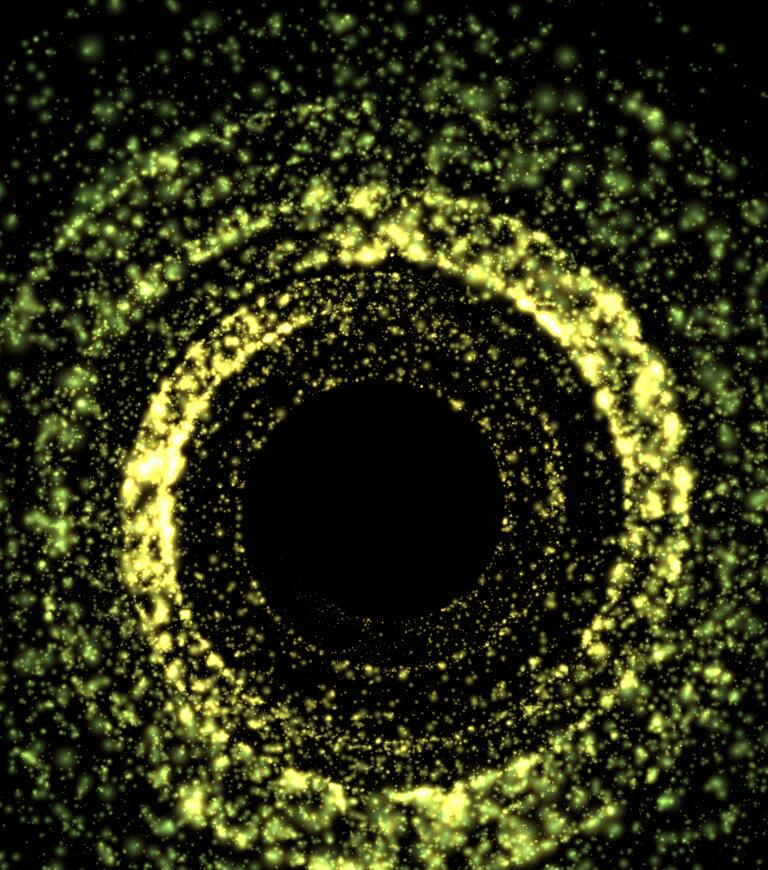
实现粒子动画效果,核心在于使用JavaScript操作Canvas,模拟大量粒子的运动和交互,从而创造出各种炫酷的视觉效果。这涉及到粒子的创建、属性定义、运动规律、以及渲染等多个环节。
解决方案
Canvas初始化:
首先,在HTML中创建一个<canvas>元素,并使用JavaScript获取其上下文(context)。这是所有绘图操作的基础。
<canvas id="particleCanvas"></canvas>

<script>
  const canvas = document.getElementById('particleCanvas');
  const ctx = canvas.getContext('2d');
  canvas.width = window.innerWidth;
  canvas.height = window.innerHeight;
</script>粒子类定义:
创建一个Particle类,用于表示单个粒子。每个粒子应包含位置(x, y)、速度(vx, vy)、大小(radius)、颜色等属性。
class Particle {
  constructor(x, y, vx, vy, radius, color) {
    this.x = x;
    this.y = y;
    this.vx = vx;
    this.vy = vy;
    this.radius = radius;
    this.color = color;
  }

  draw() {
    ctx.beginPath();
    ctx.arc(this.x, this.y, this.radius, 0, Math.PI * 2);
    ctx.fillStyle = this.color;
    ctx.fill();
  }

  update() {
    this.x += this.vx;
    this.y += this.vy;

    // 边界检测,简单反弹
    if (this.x + this.radius > canvas.width || this.x - this.radius < 0) {
      this.vx = -this.vx;
    }
    if (this.y + this.radius > canvas.height || this.y - this.radius < 0) {
      this.vy = -this.vy;
    }
  }
}粒子数组创建:
创建一个粒子数组,并随机生成多个粒子实例,添加到数组中。
const particles = [];
const numParticles = 100; // 粒子数量

for (let i = 0; i < numParticles; i++) {
  const radius = Math.random() * 5 + 1; // 1-6
  const x = Math.random() * (canvas.width - radius * 2) + radius;
  const y = Math.random() * (canvas.height - radius * 2) + radius;
  const vx = (Math.random() - 0.5) * 2; // -1 到 1
  const vy = (Math.random() - 0.5) * 2; // -1 到 1
  const color = `rgba(${Math.random() * 255}, ${Math.random() * 255}, ${Math.random() * 255}, 0.8)`;
  particles.push(new Particle(x, y, vx, vy, radius, color));
}动画循环:
使用requestAnimationFrame创建一个动画循环,不断更新每个粒子的位置,并重新绘制Canvas。
function animate() {
  requestAnimationFrame(animate);
  ctx.clearRect(0, 0, canvas.width, canvas.height); // 清空画布

  for (let i = 0; i < particles.length; i++) {
    particles[i].update();
    particles[i].draw();
  }
}

animate();交互效果(可选):
可以添加鼠标交互,例如鼠标悬停时改变粒子属性,或鼠标点击时产生新的粒子。
canvas.addEventListener('mousemove', (event) => {
  const mouseX = event.clientX;
  const mouseY = event.clientY;

  for (let i = 0; i < particles.length; i++) {
    const dx = mouseX - particles[i].x;
    const dy = mouseY - particles[i].y;
    const distance = Math.sqrt(dx * dx + dy * dy);

    if (distance < 50) {
      // 鼠标靠近时加速
      particles[i].vx += dx * 0.01;
      particles[i].vy += dy * 0.01;
    }
  }
});优化Canvas粒子动画性能,关键在于减少不必要的计算和渲染。可以从以下几个方面入手:
减少粒子数量: 粒子数量是影响性能的最直接因素。在保证视觉效果的前提下,尽量减少粒子数量。可以使用更复杂的渲染技巧来弥补粒子数量的不足。
使用离屏Canvas: 对于静态不变的部分,可以先在离屏Canvas上绘制,然后一次性将离屏Canvas的内容复制到主Canvas上。
优化粒子更新逻辑: 避免在每次更新时进行复杂的计算。例如,可以使用查表法代替复杂的数学运算。
减少Canvas状态切换: Canvas状态切换(如fillStyle、strokeStyle等)会带来性能开销。尽量减少状态切换的次数。
使用Web Workers: 将粒子更新逻辑放到Web Workers中执行,避免阻塞主线程。
合理使用透明度: 大量半透明粒子会增加渲染负担。可以适当调整粒子的透明度,或者使用其他技巧来模拟透明效果。
避免使用shadowBlur: shadowBlur会显著降低渲染性能。尽量避免使用,或者使用其他方式来模拟阴影效果。
实现更复杂的粒子运动效果,需要修改粒子的update()方法,引入更复杂的力学模型。
吸引力:
update() {
  const dx = mouseX - this.x; // 假设mouseX和mouseY是鼠标坐标
  const dy = mouseY - this.y;
  const distance = Math.sqrt(dx * dx + dy * dy);
  const force = (distance < 100) ? 0.1 : 0; // 距离越近,吸引力越大

  this.vx += dx / distance * force;
  this.vy += dy / distance * force;

  this.x += this.vx;
  this.y += this.vy;
}排斥力:
与吸引力类似,但力的方向相反。
update() {
  const dx = mouseX - this.x;
  const dy = mouseY - this.y;
  const distance = Math.sqrt(dx * dx + dy * dy);
  const force = (distance < 50) ? -0.2 : 0; // 距离越近,排斥力越大

  this.vx += dx / distance * force;
  this.vy += dy / distance * force;

  this.x += this.vx;
  this.y += this.vy;
}跟随:
让粒子跟随鼠标的运动轨迹。可以使用简单的平滑算法。
update() {
  this.vx = (mouseX - this.x) * 0.1; // 0.1是平滑系数
  this.vy = (mouseY - this.y) * 0.1;

  this.x += this.vx;
  this.y += this.vy;
}粒子间的相互作用:
需要遍历所有粒子,计算它们之间的距离和力,并更新粒子的速度。这会显著增加计算量,需要谨慎优化。
将粒子动画与用户输入结合,可以创造出更具交互性的体验。除了前面提到的鼠标交互,还可以使用键盘、触摸等输入方式。
键盘控制:
例如,可以使用键盘的上下左右键来改变粒子的运动方向。
document.addEventListener('keydown', (event) => {
  if (event.key === 'ArrowUp') {
    particles.forEach(particle => particle.vy -= 1);
  } else if (event.key === 'ArrowDown') {
    particles.forEach(particle => particle.vy += 1);
  } // ... 其他方向
});触摸控制:
在移动设备上,可以使用触摸事件来控制粒子的运动。
canvas.addEventListener('touchstart', (event) => {
  const touch = event.touches[0];
  mouseX = touch.clientX;
  mouseY = touch.clientY;
});

canvas.addEventListener('touchmove', (event) => {
  const touch = event.touches[0];
  mouseX = touch.clientX;
  mouseY = touch.clientY;
});音频输入:
可以使用Web Audio API获取音频输入,并根据音频的频率和幅度来控制粒子的属性,例如颜色、大小、速度等。
重力感应:
在移动设备上,可以使用重力感应器来控制粒子的运动方向。
关键在于将用户输入转化为粒子的属性变化,并保持动画的流畅性和响应性。
以上就是js如何实现粒子动画效果 Canvas打造炫酷粒子特效的详细内容,更多请关注php中文网其它相关文章!

每个人都需要一台速度更快、更稳定的 PC。随着时间的推移,垃圾文件、旧注册表数据和不必要的后台进程会占用资源并降低性能。幸运的是,许多工具可以让 Windows 保持平稳运行。

 广告
广告


Copyright 2014-2025 https://www.php.cn/ All Rights Reserved | php.cn | 湘ICP备2023035733号


 561
561


